Postman is a free app that makes it easy to build, test, and document your APIs. It has powerful API testing features that strike a good balance between power and ease-of-use.
- Demo setup instructions
- Testing one request at a time
- Running tests in the Test Runner
- Running tests from the command line
JavaScript tests
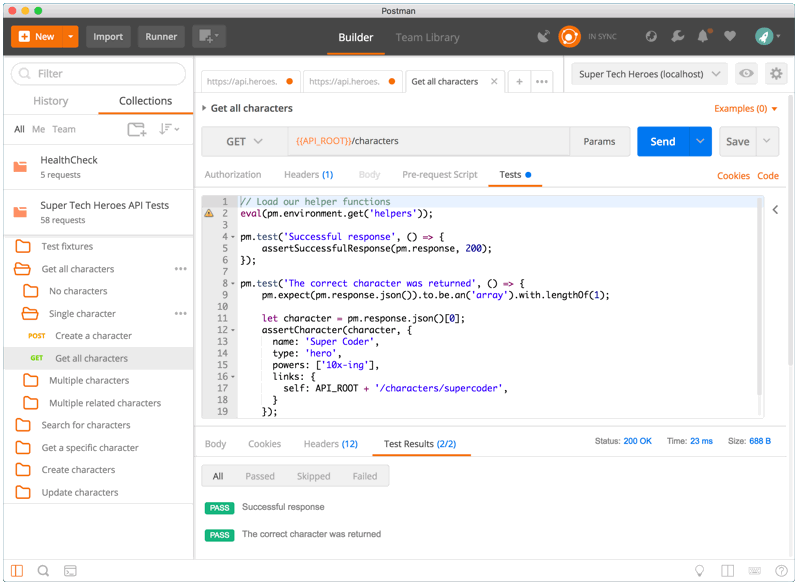
Postman tests are written in JavaScript using a fluent-style syntax. There’s no GUI test builder like there is in Restlet or Stoplight. This means that the initial learning curve for writing tests may be a bit higher, but it also means that you have much more power and flexibility.
Postman includes several JavaScript libraries to help you with complex things like hasing and encryption or JSON Schema validation.
Flow control
One powerful feature of Postman is the setNextRequest() function, which enables all sorts of flow-control logic. You can conditionally skip certain requests, change the order of requests, repeat requests in a loop, etc.
For example, if your API returns paged results, you may need to repeat the same GET request several times to get all of the data. The setNextRequest() function enables this, since you can keep setting the GET request as the next request until you reach the end of the results.
Re-using code
Postman allows you to store data in variables, which helps reduce redundancy in your tests. You can store anything in a variable, including JavaScript code. This makes it easy to re-use code across multiple requests, such as common assertions, helper functions, or setup/teardown logic.
For example, the following code stores a helper function in a Postman variable. This function contains validation logic for a mailing address, which can re-used by many different requests.
pm.environment.set('assertValidAddress', function assertValidAddress (address) {
  pm.expect(address).to.be.an('object').with.keys('street1', 'street2', 'city', 'state', 'zip');
  pm.expect(address.street1).to.be.a('string').and.not.empty;
  pm.expect(address.street2).to.be.a('string');
  pm.expect(address.city).to.be.a('string').and.not.empty;
  pm.expect(address.state).to.be.a('string').with.lengthOf(2);
  pm.expect(address.zip).to.be.a('string').with.lengthOf(5).and.match(/^\d+$/);
});
Now that the helper function has been saved in a variable, you can use it anywhere in your tests. You just need to eval() the variable to load the code into the test script.
// Load the helper function
eval(pm.environment.get('assertValidAddress'));

// Now use it in a test!
pm.test('the response should be a valid address', () => {
  assertValidAddress(pm.response.json());
});
Demo Setup
In this demo, you’ll run the same API tests in the Postman app, and from the command-line.
Step 1. Download and Install Postman
Go to the Postman website and download the app for your operating system.
Step 2. Open Postman
The first time you open the Postman app, it will ask you to sign in. You can create a free account if you want, or you can skip the sign-in step and use Postman without an account.
Step 3. Import the demo files
Click the “Import” button at the top of the Postman window, and import both of the following links:
Postman Collection
This file contains the API requests and the test scripts.
https://apitesting.jamesmessinger.com/postman/postman-collection.json
Postman Environment
This file contains environment variables, which allow the same Postman tests to be run in different environments (e.g. development, staging, prod)
https://apitesting.jamesmessinger.com/postman/postman-environment.json
Testing one request at a time
You can open each API request one-by-one in Postman’s request builder. This lets you see the details of each request, such as the URL, the HTTP method, headers, body, etc. You can also see and edit the test scripts.
If you click the “Send” button in the request builder, it will send the request and automatically run the test script. You can see the test results at the bottom of the screen. Tests that succeeded are green, and any failed tests are red.
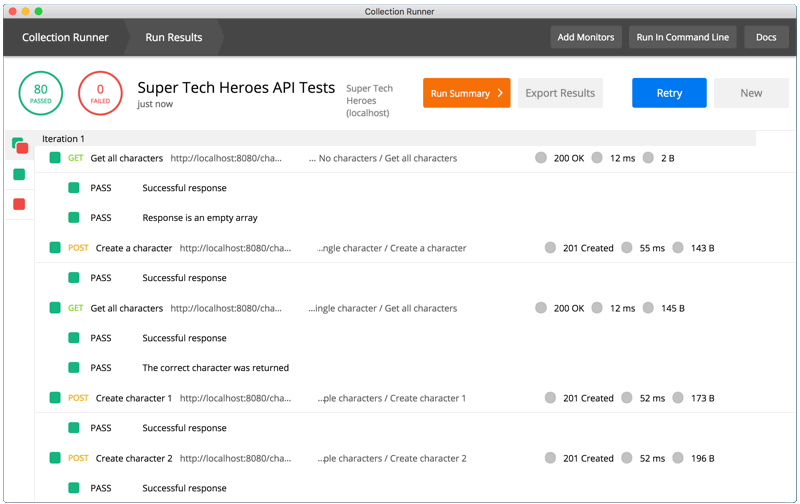
Running tests in the test runner
Postman’s test runner runs all of your tests and shows you the results in a friendly GUI. Just click the “Runner” button at the top of the main Postman window.
In the test runner, you’ll need to select the demo collection and environment from the lists. Don’t worry about the other settings for now. Just click the “Run” button at the bottom of the screen and watch your tests run. You’ll see the same red and green indicators that you saw on the request builder. In addition, you’ll see an overview at the top, which shows the percentage of passeed and failed tests.
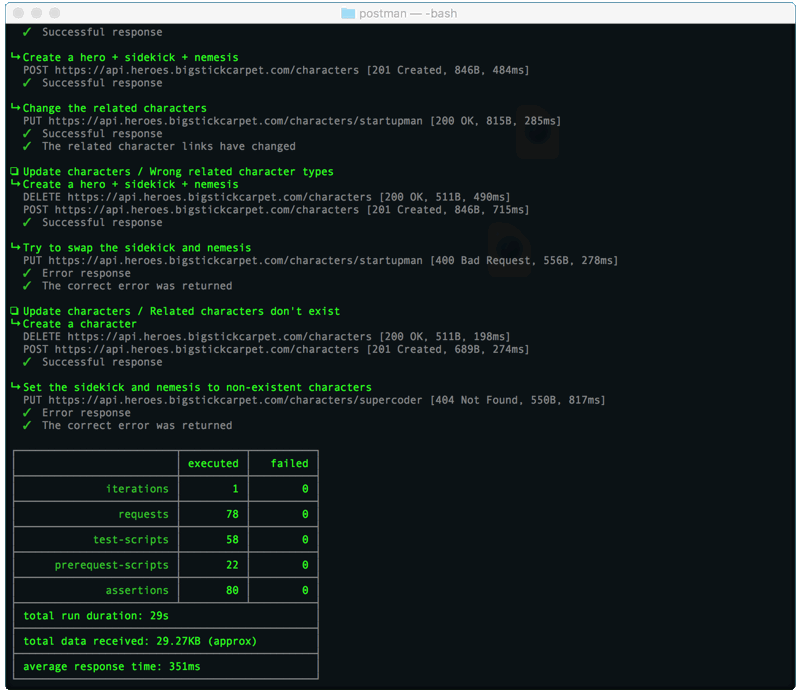
Running tests from the command line
Newman is Postman’s command-line test runner. If you prefer the CLI instead of a GUI, then this the tool for you. It’s also ideal for automated testing and CI/CD integration. You can integrate Newman into any CI/CD system that supports Node.js, including Travis-CI, Jenkins, and others.